 Save $$ every time you buy Tangie bar
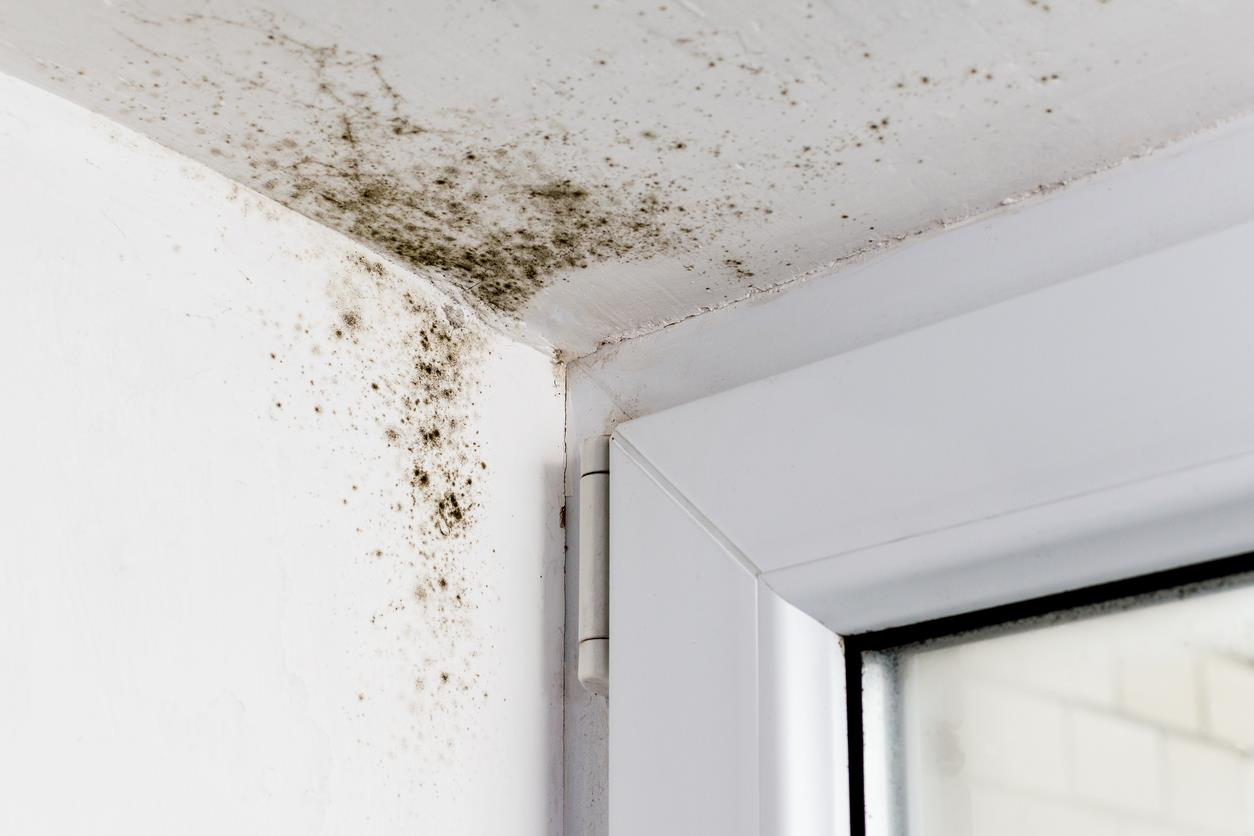
Does Vinegar Help in Getting Rid of Mold & Mildew?

Dealing with mold in your home can be a daunting and alarming situation. Mold growth isn’t just an unsightly nuisance; it poses serious risks to the integrity of your house and the health of your family. Even short-term exposure can trigger allergic reactions, causing distressing symptoms like itchy eyes, a runny nose, and throat irritation. More severe reactions can manifest as frequent nosebleeds and debilitating headaches.
The danger escalates with prolonged exposure, leading to respiratory issues like asthma attacks or even serious lung infections. Ignoring mold can spiral into worsening health problems and costly repairs, so it’s crucial to address it promptly.
There is a wealth of advice available on how to eliminate mold using common household items. Among these, bleach and vinegar are the most frequently recommended. But do these substances actually eliminate mold? Let’s explore which products are truly effective against mold and how you can apply them properly in your home.
- Can Vinegar Kill Mold & Mildew?
- Does Bleach Kill Mold?
- Is Hydrogen peroxide or vinegar better for mold?
- How To Limit Mold During Winter?
Can Vinegar Kill Mold & Mildew?
Yes, vinegar can indeed kill mold.
Many people might think of bleach when it comes to cleaning and disinfecting surfaces, but just because bleach is not an option doesn’t mean you have to forgo effective mold removal. In fact, there are likely items in your pantry that can be just as effective, if not more so. One of the most powerful and readily available options is white vinegar.
White vinegar is recognized for its mild acidity, which contributes to its mold-killing abilities. Studies indicate that white vinegar can eradicate approximately 82 percent of mold species.
This means that by using vinegar, not only can you eliminate existing mold, but you can also proactively prevent mold from recurring in the future. This is particularly beneficial in damp areas prone to mold growth, such as bathrooms, kitchens, and basements.
The science behind vinegar’s efficacy against mold lies in its composition. Vinegar contains acetic acid, which possesses strong antifungal and antibacterial properties. The pH level of vinegar is around 2.5, making it quite acidic. This acidity disrupts the cellular structure of mold spores, inhibiting their ability to grow and reproduce. As a result, vinegar can effectively stop the spread of mold, fungi, and other microorganisms that may pose a risk to your health and the integrity of your home.
When using vinegar to combat mold, it’s often recommended to pour undiluted white vinegar into a spray bottle and apply it directly to the affected areas. Allow it to sit for at least an hour before wiping or scrubbing the surface clean. This not only helps in the removal of mold but also ensures that the acetic acid acts effectively on the spores.
| The best way to get rid of mold & mildew from your clothes, follow the steps below – Identify Affected Areas: Check your clothes for any visible signs of mold or mildew. Look for dark spots or musty odors. Prepare a Vinegar Solution: Mix equal parts of white vinegar and water in a spray bottle. For larger batches, you can use a bucket or basin to mix 1 cup of vinegar with 1 cup of water. Apply the Solution: Spray the vinegar solution directly onto the affected areas of the clothing. If using a bucket, soak the affected clothes in the vinegar solution for about 30 minutes. Gently Scrub (if necessary): For stubborn spots, use a soft brush to gently scrub the area. Be careful not to damage the fabric. Wash the Clothes: After treating the affected areas, wash the clothes in your washing machine using your regular laundry detergent. If possible, use hot water, as it helps kill mold spores more effectively. Add Extra Vinegar: For added effectiveness, you can add 1 cup of white vinegar to the rinse cycle. This helps to further eliminate any remaining mold spores and odors. Dry Thoroughly: After washing, dry the clothes completely. If possible, hang them outside in the sun, as sunlight can help kill any remaining spores. If using a dryer, ensure the clothes are fully dry before putting them away. Check for Odors: Once dry, check your clothes for any lingering odors. If necessary, repeat the process until the mold and mildew are completely gone. |
7 Steps for Using Vinegar to Kill Mold in Your Home
Mold can be a persistent problem in many households, often appearing in damp and humid environments. One of the most effective and natural ways to combat small outbreaks of mildew & mold is by using plain white distilled vinegar. Here are detailed steps you can take to utilize vinegar for mold removal:
Wear Protective Clothing
Before you start the mold remediation process, it’s important to prioritize your safety. Mold can have harmful health effects, especially if you are allergic or sensitive to it.
Equip yourself with protective clothing. This includes wearing a mask to avoid inhaling mold spores, goggles to shield your eyes from any splashes, and gloves to protect your skin from direct contact with mold and any cleaning solutions. Consider wearing disposable overalls or old clothes that you can safely throw away afterwards.
Things you need –
- undiluted white vinegar with at least 5 percent acetic acid
- non-porous gloves
- face mask
- protective eyewear
- spray bottle
- cleaning rag
- soft brush
Prepare the Vinegar Solution
Vinegar is highly effective on its own due to its acetic acid content, which has antifungal properties. To get started, pour plain, white distilled vinegar into a clean spray bottle.
It is essential not to dilute the vinegar with water, as this may reduce its potency against mold. A concentration of 5% acetic acid is usually sufficient to kill most types of mold. For larger areas or heavy mold infestations, consider using multiple bottles of vinegar.

Spray the Vinegar
Once your vinegar solution is ready, spray it directly onto the affected moldy area. Make sure to saturate the area thoroughly; the goal is to allow the vinegar to penetrate the mold to break it down.
After spraying, let the vinegar sit for at least an hour without rinsing or scrubbing. This waiting period allows the vinegar time to be absorbed by the mold, enhancing its effectiveness. During this time, you may want to ventilate the room to help with the strong smell of vinegar that will dissipate after some time.
Create a Baking Soda Solution
After the vinegar has had time to work, you may need to scrub the area if the mold persists. To create a baking soda solution, combine 1 teaspoon of baking soda with 2 cups of water in another spray bottle.
Shake the mixture until the baking soda is thoroughly dissolved. Baking soda not only helps scrub away the mold but also acts as a deodorizer, further combating any lingering odors from the vinegar.
Scrub the Mold
Spray the baking soda solution directly onto the moldy area where you’ve previously applied vinegar. Using a scrubbing brush or a scouring pad, vigorously scrub the moldy surfaces.
This process will help to dislodge the mold and remove any remaining spores. As with the vinegar application, remember to wear your protective gear to avoid skin irritation or other potential health risks from mold exposure.
Rinse the Area
Once scrubbing is complete, it’s time to rinse the area to remove any remaining mold fragments and cleaning solutions. Use clean, warm water and a clean cloth or sponge to wipe down the surfaces. This step helps to ensure that all residues of vinegar and baking soda are completely washed away, leaving the area clean and safe.
Prevent Regrowth
To ensure that mold does not return, spray the area again with either the leftover vinegar or the baking soda solution. Allow the spray to dry naturally; this will help to eliminate any remaining mold spores and inhibit their regrowth. Check every area of the house where you feel moisture could cause mold or mildew.
The vinegar’s strong smell may linger, but it should fade within a few hours, leaving the area sanitized. Additionally, consider addressing any sources of moisture in your home, such as leaks or poor ventilation, to prevent future mold outbreaks.
Effectiveness of Vinegar to Remove Mold on Different Surfaces
Mold can be a persistent and unsightly problem in homes, leading many homeowners to seek effective solutions for its removal. Vinegar, a household staple known for its antimicrobial properties, is often touted as a natural alternative for mold remediation.
However, it’s important to understand that while vinegar can be useful in certain situations, it may not be suitable for all surfaces. Below are detailed insights on the effectiveness of vinegar for mold removal on various common household surfaces, along with safety considerations:
Drywall
When it comes to drywall, vinegar is effective in killing mold on the surface.
The acetic acid in vinegar disrupts the growth of mold spores, making it a viable option for addressing mold infestations. However, care must be taken while applying vinegar to drywall, as vigorous scrubbing can lead to damage beneath the surface. It’s advisable to use gentle cleaning methods and a soft cloth to minimize any potential harm.
Concrete
While vinegar will not damage concrete, it is important to note that it is not the most effective solution for killing mold on this surface.
Concrete’s porous nature allows for mold to penetrate deeply, which vinegar may not be able to reach. Hence, while using vinegar is safe, homeowners may want to explore stronger mold remediation methods specifically designed for concrete surfaces. Additionally, caution should be exercised when using vinegar around cement, as it may cause damage in some cases.
Leather
For leather, vinegar can effectively kill mold without causing irreparable harm if used properly.
It is often recommended to dilute vinegar with an equal part of water (1:1 ratio) to create a gentler solution. When cleaning leather, it’s best to use a soft cloth to apply the solution and prevent any potential scratches or damage to the material. Testing the mixture in an inconspicuous area can help determine if there will be any adverse effects before treating the entire surface.
Stone Countertops
Stone countertops, particularly those made from marble and granite, are best kept away from vinegar.
The acidic nature of vinegar can dull the finish of these surfaces or even buff them over time, diminishing their aesthetic appeal. For mold removal on stone countertops, it is advisable to use cleaning products specifically formulated for natural stone, as these will be effective without risking damage.
Wooden Surfaces
When dealing with wooden surfaces, such as hardwood floors and furniture, vinegar is not recommended for mold removal.
The acidity can strip away the wood’s protective finish, leading to potential damage. Instead, homeowners should consider alternative cleaning methods for mold removal on wood that do not compromise the integrity of the surface.
Porous Surfaces
Vinegar is ineffective at killing mold from porous surfaces, such as carpet and fabric.
In these cases, mold can infiltrate deep into the material, making it difficult for vinegar to reach and eradicate the spores. If mold is discovered on porous items, it is often better to consult with a professional mold remediation specialist or consider replacing the affected items entirely.
Metal
While vinegar is a powerful cleaning agent, its acidity levels pose a risk to many types of metals.
Metals such as copper, aluminum, and stainless steel can corrode when exposed to vinegar over time. Homeowners should avoid using vinegar as a cleaning agent on metals and consider other solutions that are safe for maintaining these materials.
| Surface | Effectiveness of Vinegar for Mold Removal | Risks / Precautions | Recommended Approach |
|---|---|---|---|
| Drywall | Effective at killing mold on the surface due to acetic acid. | Vigorous scrubbing can damage the drywall beneath the surface. | Use gentle cleaning with a soft cloth; avoid excess moisture or pressure. |
| Concrete | It can damage the finish and reduce shine over time. | It may not reach deep mold; caution is advised around cement, as vinegar can sometimes cause damage. | Consider stronger, specialized mold remediation products for concrete. |
| Leather | Effective if diluted properly (1:1 ratio with water). | Undiluted vinegar may damage or discolor leather; test in an inconspicuous area first. | Apply diluted vinegar gently with a soft cloth; avoid over-saturation. |
| Stone Countertops (Marble, Granite) | Not recommended; vinegar’s acidity can dull or etch the surface. | Ineffective, vinegar cannot reach mold embedded deep in the fibers. | Use cleaners formulated for natural stone to safely remove mold. |
| Wooden Surfaces | Not recommended for mold removal; vinegar can strip the protective finish. | May damage wood’s surface or finish. | Use alternative mold cleaners designed for wood. |
| Porous Surfaces (Carpet, Fabric) | Ineffective, vinegar cannot reach the mold embedded deep in the fibers. | Mold may remain beneath the surface even after cleaning. | Consult a professional mold remediation specialist or replace affected items. |
| Metal (Copper, Aluminum, Stainless Steel) | May not reach deep mold; caution is advised around cement, as vinegar can sometimes cause damage. | Corrosion and pitting may occur with repeated exposure. | It may not reach deep mold; caution is advised around cement, as vinegar can sometimes cause damage. |
Does Bleach Kill Mold & Mildew?
No, bleach does not kill mold. The Environmental Protection Agency (EPA) does not recommend using bleach to kill or remove mold.
The common belief that bleach can effectively kill mold is, in fact, a myth!
In reality, bleach only addresses surface mold, failing to eliminate the root problem that exists beneath the visible layer of mold, which is often a black, fuzzy growth. This underlying mold membrane is where the true issue resides and is crucial for understanding how to effectively deal with mold infestations.
When bleach is used in an attempt to combat mold, it typically results in a resurgence of mold growth, often more severe than before. The chemical properties of bleach prevent it from penetrating porous materials such as drywall, wood, or fabric. As a result, mold membranes can retreat deeper into these surfaces to avoid contact with the bleach. This deeper infiltration allows the mold to escape the immediate threat posed by the chemical, effectively giving it a chance to flourish.
Interestingly, when mold is first exposed to bleach, it recognizes the chemical as a potential threat. In a somewhat paradoxical twist, it can even utilize the bleach as a source of nutrients, allowing it to grow more rapidly and thrive despite the initial attempt to eliminate it. This startling fact underscores the ineffectiveness of bleach as a mold-killing agent and highlights the complexity of mold biology and its survival strategies.
If you’re seeking an effective solution for eradicating mold within your home, it’s clear that bleach is not the answer. Instead, consider using specialized mold removal products or natural alternatives that can penetrate deeper surfaces where mold tends to hide, ensuring that both the visible growth and its root cause are adequately addressed.
Remember, proper mold remediation involves not only killing the visible mold but also managing the moisture issue that allowed mold to thrive in the first place.
Is Hydrogen Peroxide or Vinegar Better for Mold?
Both hydrogen peroxide and vinegar are effective for treating mold, but they work differently. Hydrogen peroxide is a stronger antifungal agent and can penetrate porous materials, making it great for deeper mold removal.
It’s typically more effective on tough mold stains. Vinegar, on the other hand, is milder and can kill most mold types but may not be as effective on stubborn growths. It’s also less harsh on fabrics and surfaces. For best results, consider using hydrogen peroxide for serious infestations and vinegar for lighter mold issues or prevention.
If you have mold in your bathroom or kitchen, hydrogen peroxide can effectively clean and whiten while eliminating it. For places like basements or wood, vinegar is the best choice since it penetrates more deeply.
Avoid combining vinegar and hydrogen peroxide. Choose one based on the surface you’re cleaning, as mixing them produces toxic peracetic acid, which can irritate your skin, eyes, throat, and lungs.
How To Limit Mold During Winter?
Cold and wet winter months can create the perfect atmosphere for mold to grow. When water from rain, sleet, and snow during these winter months gets tracked inside homes, this influx of moisture can create a more humid environment, allowing mold to flourish more quickly. In optimal conditions, mold can begin to proliferate within a mere 24 to 48 hours.
Unfortunately, mold growth often goes unnoticed until it has already compromised large areas of the property and caused significant structural damage. Given the serious implications of mold infestation, it is crucial to prioritize prevention over repair. Here are some comprehensive tips on how to prevent mold from establishing itself within your home.
Tips To Control Mold Growth In Winter
The Environmental Protection Agency (EPA) recommends maintaining indoor humidity levels below 60% to keep mold growth at bay.
To effectively manage indoor mold growth, it is essential to diligently monitor and control the moisture levels within your home. Should you notice an increase in humidity, it is important to identify the sources of added moisture and rectify the issue promptly. Utilizing a dehumidifier in affected areas can assist in lowering the moisture levels until a more permanent solution is implemented.
Increase Air Circulation
Adjusting ceiling fans to turn in reverse during the winter months can significantly improve air circulation. In the summer, they should rotate counterclockwise to create a cooling effect, while in winter, a clockwise direction pulls colder air upward and allows warmer air to descend, helping to warm your space and potentially lowering your energy bills. Proper air circulation is also vital in preventing condensation from accumulating on cold walls and windows, which can act as breeding grounds for mold.
Utilize Exhaust Fans
In areas prone to moisture accumulation, such as the bathroom and kitchen. Activities like boiling water or taking long showers generate substantial humidity. Always remember to activate exhaust fans during these times, including the range hood in your kitchen, to dissipate excess moisture and enhance air flow. Improved air circulation is pivotal in minimizing stagnant areas where mold can thrive.
Regularly Inspect Plumbing Pipes
To ensure they are in good working order. Pipes are inherently cold and humid; if they develop leaks or malfunctions, they can produce wet spots on floors or walls that are ideal for mold growth. Addressing plumbing issues swiftly is essential to safeguarding your home from mold.
Maintain Your Roof Gutters
By cleaning and repairing them frequently, especially in the fall when leaves may clog them. Additionally, ensure that the grading around downspouts directs water away from the foundation of your home. Proper drainage is essential in preventing water from pooling near your home, which can create conditions favorable to mold growth.
Three Easy Ways You Can Improve Air Circulation
Open Windows – One of the simplest yet effective methods to enhance air flow indoors is by opening windows when weather conditions allow. Opening windows or doors on opposite sides of the house creates cross-ventilation, allowing fresh air to circulate throughout the home while expelling excess humidity. On days without sufficient breezes, position a fan near an open window, directing airflow inside to enhance cross-ventilation.
Install Fans – Various types of fans, including ceiling fans, bathroom exhaust fans, attic fans, and kitchen exhaust fans, play a vital role in promoting better air circulation throughout the home.
Ceiling fans are excellent for maintaining comfort during warmer temperatures by enhancing airflow. In bathrooms, where high moisture levels can encourage mold growth, exhaust fans are particularly beneficial; they exhaust humid air outside while inviting fresh air in, drying out the space effectively.
Furthermore, ensuring proper ventilation in the attic is important to prevent moisture accumulation and potential mold issues. Utilizing the “fan only” mode of your HVAC system also contributes to improving air circulation.
Add A Dehumidifier – Since mold thrives in humid environments, incorporating a dehumidifier can significantly hinder its growth by decreasing atmospheric moisture levels.
Dehumidifiers effectively dry the air while circulating it and are particularly useful in combating humidity in areas prone to mold, such as basements. They provide a targeted, energy-efficient approach to managing moisture levels in problem areas without the need to run the entire air-conditioning system.
By implementing these strategies, you can effectively reduce the likelihood of mold growth in your home during the damp winter months. Prioritizing air circulation, maintaining humidity levels, and addressing moisture sources can create a healthier living environment while protecting your property from mold-related damage.
If you’ve discovered traces of mold in your home, it’s completely understandable to feel concerned. Mold can sometimes thrive in hidden places where moisture builds up, such as behind walls, under flooring, or in attics and basements. Even if the visible signs seem small, it’s important to take action quickly. Mold can lead to serious health issues, including respiratory problems and allergic reactions, which can affect you and your loved ones.
Seeking professional help from mold remediation specialists can be a reassuring step. These experts not only have the tools and knowledge to identify the source of the moisture but also to safely remove the mold and prevent it from coming back. They conduct thorough inspections, often using advanced techniques like infrared imaging to uncover hidden moisture issues that might be affecting your home.
Taking prompt action is crucial—not just for your health but also for the safety and integrity of your home. Remember, you’re not alone in this; there are professionals ready to help you create a safe, healthy environment for you and your family.

 Common Places To Check for Mold in Your Home


")

